From Artwork to Finished Product: The Custom Merchandise Manufacturing Process
Why Great Artwork Does Not Always Become Great Merchandise
A character design can look perfect on a screen and still face unexpected challenges once it becomes an enamel pin, an acrylic standee, or a metal keychain sitting in a fan's hands.
Between artwork and a finished product, several stages of review, adjustment, and quality confirmation are required. Understanding this process helps brands plan timelines, communicate effectively, and avoid costly production issues.
This guide walks through each stage of the custom merchandise manufacturing process, from the first artwork review to final delivery, so brands know what to expect — and what actually happens behind the scenes — at every step.
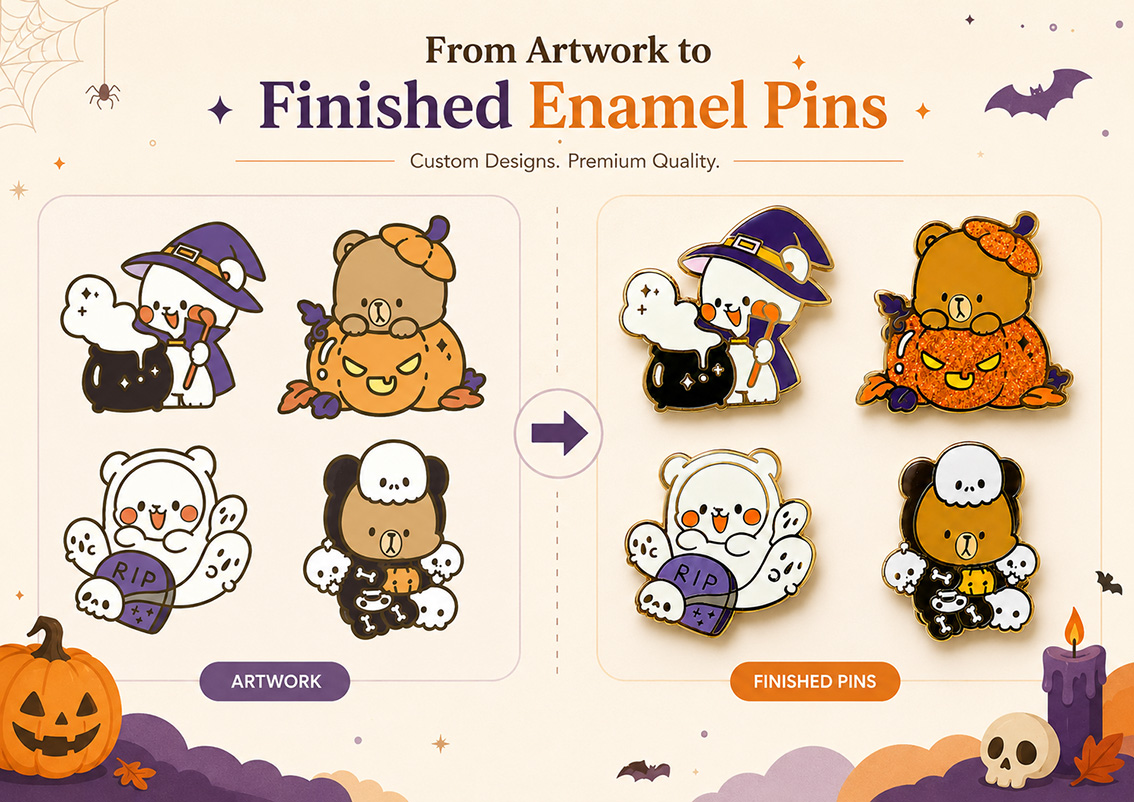
Step 1 — Artwork Review: Turning Creative Ideas Into Production-Ready Designs
The process begins with artwork review.
During this stage, manufacturers usually look for potential production challenges before they become costly problems. A design created for digital display is not automatically ready for enamel pins, acrylic standees, or metal keychains, and small details that look perfectly clear on screen do not always survive the jump into a physical product.
For example, fine details that read clearly on screen may become difficult to reproduce on a small enamel pin. Complex color areas may need to be simplified, and certain structures may require adjustment before they can be manufactured at all. None of this is unusual — it is simply part of translating a design from one medium into another.
The purpose of this stage is not to change the original creative idea. It is to make sure the character can be successfully translated into a physical product without losing the details that make it recognizable.
Step 2 — Production Adaptation: Adjusting Artwork for Different Products
Once artwork clears review, it needs to be adapted for the specific product it will become — and this is where the same character can end up looking quite different depending on what it's being made into.
For example, a cat character designed for a digital illustration may have very thin whiskers and small facial details. When adapted into an enamel pin, those details may need to be simplified, because the metal outline and enamel-filling process both have physical limits on how fine a line can be. The same character, however, can keep far more of its original detail when developed into an acrylic standee, since printing allows for much richer visual information than metal and enamel do. This difference is why the same character may require different artwork adjustments for enamel pins, acrylic standees, and metal keychains.
Each product has different physical limitations, but the character still needs to remain consistent across the entire collection.
This is why a manufacturing partner with experience across multiple product categories matters. Rather than treating every product as its own isolated technical problem, an experienced partner already knows which details need to flex for enamel, which survive fine in print, and how to guide a brand through those trade-offs without losing the character's identity along the way.
Step 3 — Sampling: Improving the Product Before Mass Production
Sampling is where the design becomes a real, physical object for the first time.
This stage is often treated as a simple approval checkpoint, but it plays a more active role than that. A first sample gives the brand a chance to see exactly how color, material, size, and finish come together in real life, and to catch anything that needs to change before thousands of units are committed to production. If an adjustment is needed, a revised sample follows, and the cycle repeats until the brand is satisfied — that final approved sample then becomes the standard the entire production run is measured against.
For brands developing more than one product at a time, sampling also serves a second purpose: it's the stage where consistency across the collection gets checked. If the same character is being produced as a pin, a keychain, and a standee together, sampling is where a manufacturer can confirm that the color, proportions, and overall feel genuinely match across all three — not just that each item looks fine on its own.
Simple products may complete sampling within 3–7 business days, while more complex or multi-material products may require 10–15 business days. It's worth building at least one revision cycle into the timeline, since even well-prepared artwork sometimes reveals small surprises only visible once it's a physical sample in hand.
Step 4 — Mass Production: Turning Approved Samples Into Real Products
Once a sample is approved, the project moves into full production — and the priority shifts from getting the design right to keeping it consistent across every single unit.
The approved sample becomes the reference point for the entire run. Rather than only checking the final output, a good production process checks in along the way, comparing units against that approved sample at several points during the run rather than waiting until everything is finished to find out something drifted. Depending on the product type, this may include checking plating consistency for metal products, printing alignment for acrylic products, and assembly quality for multi-part items such as gift sets.
For complex projects, manufacturers may also provide production updates or QC photos to keep brands informed before shipment.
How long this takes depends on the product itself — its material, how many finishing steps it needs, and how many units are being made. Simpler products in smaller quantities generally move faster, while anything involving custom tooling or multiple finishing steps needs more runway. This is really a conversation worth having with a manufacturer before placing an order, rather than something to assume based on a rough guess.
Step 5 — Quality Control and Packaging: Ensuring Every Detail Meets Expectations
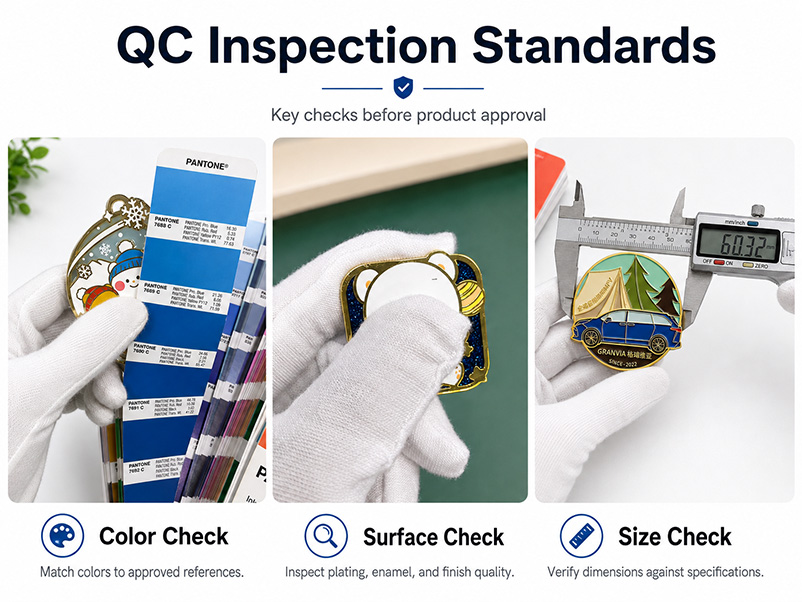
Before merchandise leaves the factory, it goes through a final round of quality control.
For IP merchandise, this check goes beyond whether the product simply functions. Inspectors are comparing character detail, color accuracy, and finishing against the approved sample across the whole batch, since the goal is for every single unit to feel like it belongs to the same collection — not just the handful that happen to get spot-checked.
At the same time, packaging comes together. For collectible merchandise, packaging isn't really separate from the product itself — a backing card on a pin, an insert alongside a keychain, or a branded box for a gift set all shape how a fan experiences the item the moment they open it. A well-designed gift box can also turn several individual products, such as a pin, a keychain, and a small snow globe, into a single premium collector set that feels far more valuable than the same items sold separately. This stage is where small inconsistencies, like a slightly off color or an incomplete enamel fill, get caught before they ship out, rather than after a customer has already opened the box.
Step 6 — Shipping and Delivery: Bringing Merchandise to Market
The final stage is getting finished merchandise from the factory into the brand's hands — or directly to fans.
Depending on the destination and order size, this usually involves export paperwork, arranging freight, and clearing customs. Brands working with an overseas manufacturer are best served by planning for this stage as part of the overall timeline from the start, rather than treating it as an afterthought once production wraps up.
Clear communication here — accurate shipping quantities, correct labeling, agreed delivery windows — goes a long way toward avoiding last-minute delays, which matters even more for seasonal or limited-edition releases tied to a specific launch date.
Manufacturing Timeline Overview
Exact timelines vary by product and order size, but a typical custom merchandise project generally follows a pattern like this:
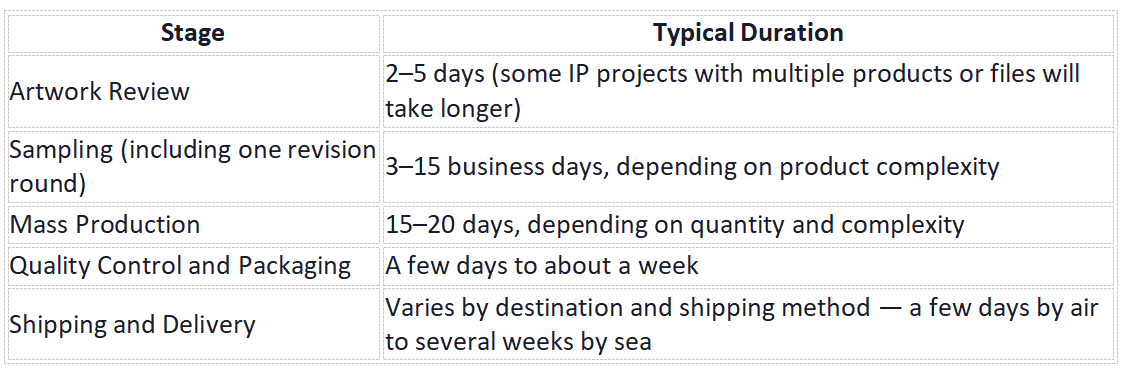
Brands planning a launch date — especially for seasonal or limited-edition products — should work backward from that date and build in extra time for at least one sampling revision.
Common Mistakes Brands Should Avoid
Artwork isn't production-ready.
Files designed only for digital display often need rework before they can become enamel pins, acrylic standees, or metal keychains. Catching this during artwork review is far cheaper than catching it after sampling has already started.
Sampling gets rushed.
Approving a sample too quickly, without a careful side-by-side check against the original artwork, lets problems slip through unnoticed until an entire batch is already produced.
Design changes come too late.
Changing the design after sampling has started usually means restarting part of the process from scratch. Both cost and timeline take a bigger hit than most brands expect.
MOQ gets treated as just a price detail.
Larger production runs and custom tooling both affect how far in advance a brand needs to plan. Ignoring that planning side of MOQ tends to create timeline surprises later.
No room is left for revisions.
Treating sampling as a single pass, rather than a review-and-adjust cycle, is one of the most common reasons brands end up with unrealistic expectations for how long the whole process takes.
Case Study: From Character Artwork to a Finished Metal Ornament Collection
A returning IP brand partnered with us to develop a custom metal ornament collection featuring its characters, with an initial order of 2,000 units across six designs.
The main challenge showed up early, during artwork review: the characters' original digital illustrations included fine linework — thin whiskers, small facial creases, delicate holiday accessories — that would not hold up once scaled down and reproduced in die-struck metal with enamel fill. If left as-is, several of these details risked blurring together or disappearing entirely at the ornament's final size.
To solve this, our design team worked with the brand to selectively thicken and simplify the finest lines while keeping every character clearly recognizable, rather than applying a blanket simplification across the whole set. A first round of samples was produced based on these adjustments. Reviewing the samples turned up a second issue — one character's signature color appeared noticeably warmer in enamel than it had looked in the original digital file. A corrected enamel formulation was tested in a second sample round, and the color was approved on that pass.
With samples signed off, the full run of six designs moved into mass production, with color and detail checked at intervals throughout rather than only at the end. Finished ornaments were quality-checked, packaged with branded inserts, and shipped in time for the holiday season — a project that shows how catching the right issue at the right stage, whether it's a linework detail in review or a color shift in sampling, is what keeps a design faithful to the original character all the way through to the finished product.
FAQ for Custom Merchandise for Business
How long does it take to go from artwork to a finished product?
Timelines vary by product type, complexity, and quantity, but most custom merchandise projects move through artwork review, sampling, and mass production over several weeks. Products requiring custom tooling or multiple sampling rounds generally take longer.
How long does custom merchandise sampling take?
Simple products such as enamel pins often complete sampling within 3–7 business days. More complex or multi-material products, such as items combining acrylic and metal components, may need 10–15 business days, especially if a revision round is required.
Can a manufacturer help turn character artwork into products?
Yes. A manufacturer experienced with IP merchandise typically reviews artwork before production begins, flags any details that won't translate well into the intended product, and works with the brand to adjust the design without changing the character itself. This is a standard part of the process for enamel pins, acrylic standees, metal keychains, and similar collectible items.
What should I prepare before sending artwork to a manufacturer?
Brands should provide high-resolution artwork, along with any relevant brand or style guidelines. It also helps to specify the intended product type, since different products may require different file preparation.
Can any digital artwork be turned into a physical product?
Most artwork can be adapted for production, but some elements — such as very fine details or complex gradients — may need adjustment depending on the product and manufacturing method. This is typically identified during the artwork review stage.
What happens if I want to change the design after sampling has started?
Changes after sampling has begun usually require producing a new sample to confirm the update, which can affect both timeline and cost. Reviewing artwork carefully before sampling helps minimize the need for later changes.
Turning Creative Ideas Into Merchandise Fans Love
Turning a character into a finished piece of merchandise is a process, not a single step. From artwork review and production adaptation, through sampling and mass production, to quality control and delivery, each stage plays a role in making sure the final product truly represents the original creative idea.
Understanding this process helps brands plan realistic timelines, prepare better artwork from the start, and know what to expect at each stage of development. It's also useful to keep in mind that this same process applies whether you're developing a collectible IP merchandise line or looking into custom merchandise for business — from small business promotional items to larger custom business merchandise programs.
If you have a character design, product idea, or existing merchandise plan, share it with our team. We can help evaluate the best product direction, development approach, and production process for your project.